
Showing posts with label writing. Show all posts
Showing posts with label writing. Show all posts
Friday, April 1, 2016
Labels:
art
,
Blogging
,
creating manga
,
Creative Living
,
DIY
,
writing


Last Post
At least here, anyways...
The day has finally arrived. I will no longer be updating this blog.
Now you can find me at:
Arcadiacomics.blogspot.com
There are no blog posts there yet. I will be making my first blog post next week.
This new blog is super exciting to me because it's very focused on what I like to make. I don't feel like I'm doing double duty, making a comic and writing blog posts. I can update my blog with comic pages, art, and blog posts.
Speaking of comics, Mandy & Molly is now live.
Start reading it now on my new blog, arcadiacomics.blogspot.com, Tapastic, or Smackjeeves.
So this really isn't an end, but a new beginning. Thank you for reading, and I hope to see you over at my new site.
Read More
The day has finally arrived. I will no longer be updating this blog.
Now you can find me at:
Arcadiacomics.blogspot.com
There are no blog posts there yet. I will be making my first blog post next week.
This new blog is super exciting to me because it's very focused on what I like to make. I don't feel like I'm doing double duty, making a comic and writing blog posts. I can update my blog with comic pages, art, and blog posts.
Speaking of comics, Mandy & Molly is now live.
Start reading it now on my new blog, arcadiacomics.blogspot.com, Tapastic, or Smackjeeves.
So this really isn't an end, but a new beginning. Thank you for reading, and I hope to see you over at my new site.
Wednesday, February 10, 2016
Labels:
art
,
creating manga
,
writing


Read More
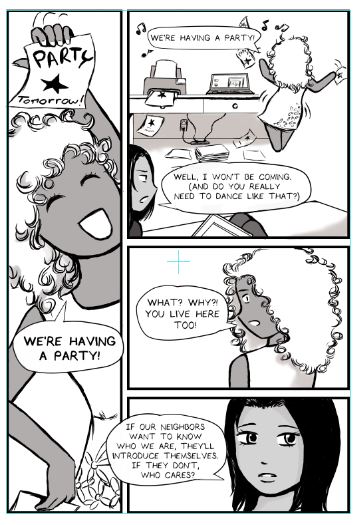
Mandy & Molly Three Page Sneak Peak!
I've posted images of these pages before, but they were all half-done and out of order. So here are the first three pages of Mandy & Molly for the first time ever, in the correct page order:
Remember that "Amy and the Scene" poster.
The band will actually be part of the plot later in the comic. Sadly, because of the way webcomics are, they probably won't appear until like next year or the year after. So there's the challenge of keeping Mandy's admiration of them in the story until that time comes.
I had to do something very similar in Mascara. I had to constantly weave football into the story so when it was time to do that major scene with the football game, it wasn't like, "Where did that come from?"
But it does give me something exciting to look forward to because they are an awesome band.
Another sneak peak of completed pages will be coming soon!
So what do you think about these pages? How do you think they compare to my older comics?
Wednesday, January 27, 2016
Labels:
creating manga
,
Creative Living
,
writing
I know that seems obvious.
But I still think it's interesting.
Awhile ago my husband and I were talking about our ideas for characters, and he mentioned how all of his characters remind him of himself.
In a story, all of the different personality traits can make seperate characters. But in real life, a bunch of different traits can be found in one person.
I know with my current project, Mandy & Molly, both characters are exaggerations of traits that I find in myself.
I think the reason why characters are simpler than real people is because they need to be understood. It takes a long time to get to know a person well. A storyteller on the other hand has a limited time to get the reader to connect with the characters.
Of course as the story goes on they can slowly reveal more subtle sides of a character. But at the start, writers usually make it very clear who the main character is and conveys the overall tone of their personality.
I think it's neat how writers work hard to mimic life on paper, but still there is only so much that can be shown to the audience.
And a side note about something totally different:
If you use Friend Connect to follow this blog, and you've signed in with a non-Google Account, you may want to read this post by Google. Basically, they are stopping support for non-Google accounts using Friend Connect. So if you want to continue following this blog, please create a Google Account and resubscribe.
And if you don't want to go through all of that trouble, simply sign up for my email list!
One of the reasons why I have an email list is because although online blogging services may change, email does not. Signing up for emails is the most stable way of keeping up with what I'm working on, especially since I now send out emails regularly like I should.
Read More
Real People are More Complex
 |
| Screen shot of my page in progress. |
But I still think it's interesting.
Awhile ago my husband and I were talking about our ideas for characters, and he mentioned how all of his characters remind him of himself.
In a story, all of the different personality traits can make seperate characters. But in real life, a bunch of different traits can be found in one person.
I know with my current project, Mandy & Molly, both characters are exaggerations of traits that I find in myself.
I think the reason why characters are simpler than real people is because they need to be understood. It takes a long time to get to know a person well. A storyteller on the other hand has a limited time to get the reader to connect with the characters.
Of course as the story goes on they can slowly reveal more subtle sides of a character. But at the start, writers usually make it very clear who the main character is and conveys the overall tone of their personality.
I think it's neat how writers work hard to mimic life on paper, but still there is only so much that can be shown to the audience.
And a side note about something totally different:
If you use Friend Connect to follow this blog, and you've signed in with a non-Google Account, you may want to read this post by Google. Basically, they are stopping support for non-Google accounts using Friend Connect. So if you want to continue following this blog, please create a Google Account and resubscribe.
And if you don't want to go through all of that trouble, simply sign up for my email list!
One of the reasons why I have an email list is because although online blogging services may change, email does not. Signing up for emails is the most stable way of keeping up with what I'm working on, especially since I now send out emails regularly like I should.
Friday, December 11, 2015
Labels:
creating manga
,
writing
Why I'm Making a Story About Sisters When I'm an Only Child
I have no siblings. Growing up with someone around my age in the house is totally unfamiliar to me. Still, I like creating stories with characters who have a brother or a sister or both. My current project is about two sisters who live together. It's inspired this strange conversation that my husband I had about what life would be like if he was my sister or if I was his brother.
Anyways, here's a note/sketch of why I find characters with siblings, especially sisters, so interesting:

Read More
Anyways, here's a note/sketch of why I find characters with siblings, especially sisters, so interesting:

On the other hand, many people find the fact that I don't have siblings interesting. Yes, I'm a little spoiled.
Wednesday, December 2, 2015
Labels:
creating manga
,
writing
Read More
Creating Flexible Serialized Stories: Part Three
Part Three: Create Chapters and Weave in a Theme
This is the final post my series about writing flexible stories. To back track, here's part one and part two.
So after organizing my events, I now have a story outline, more or less. The problem is that the events are separate things. They don't blend together. The best thing I can compare this to is a sitcom where each episode has something different going on, but there is not a cohesive story. There's nothing wrong with that, and that kind of outline will probably work well for a four panel/gag manga. However, I enjoy stories that flow from one happening to the next.
This is how I transform my list of events into an ongoing story.
I've already organized my events (for more info on what events are, see post two) into acts, so I now have a chronological story. From here I group the events into chapters.
When I group events into chapters, I don't move them around. I simply divide them up while leaving them in the order that they are in. For example, let's say I'm looking at Act One and it has 10 events. The first five events look like they have enough content to make an interesting short story--like a chapter of a book. So without moving them around, I label those five events as a chapter (sometimes I also call chapters episodes). After taking care of those 5, I have five more events in Act 1. I may decide that the next three would make a good chapter, so I label them as chapter 2. Then I could assign the last two events to be chapter 3.
So basically I look at my events, see how many in a row can make a harmonious chapter, and group them together. Some of my chapters only have one event.
Weaving in a Theme
This is the most creatively challenging part, but it's the key to making an ongoing story.
I go back and look at my chapters. Although they are in the chronological order that I want, they still are very separate from each other.
This is when I step back and look at the big picture of the story.
What do I want to happen to character A? I want her to be more social and learn to make friends.
What do I want for character B? I want her to appreciate who she is and not worry about being as talented as her sister.
Then I go through each episode and add something that will help the characters to get a tiny bit closer to their goals. And it doesn't take much. For the shy younger sister, it could be that in chapter one she sees the next door neighbor from a distance, in chapter two she manages to say hello (thanks to the prodding of her more social older sister), and in chapter three she tries to have a conversation, and so on.
These advancements aren't the point of the chapter. It isn't like a wrote an entire chapter about the younger sister trying to say "hi" to her neighbor, although I could have. It's simply a moment that's woven into a chapter and that progressively changes from chapter to chapter.
It does take a little bit of imagination stretching to do this well, but that's what writers do!
Quite a few recent TV shows have writing like this. There is an ongoing story that is mixed into episodes that may or may not be related to it.
Start Writing!
I write the script for a chapter, draw it, and then when I'm almost done drawing it, I start writing the next one. If I waited to write the entire script for a long story before drawing it, I know I would lose interest. And with a story that will take years to create, the transitions between drawing and writing are what keep it exciting.
This method is very flexible because since the episodes aren't tightly tied together, it's easy to remove the ones that don't work, and add ones that will work better. Still, they are all related to a central theme and goal, so the story doesn't lose being harmonious.
I can alter my story if I need to based on my personal feelings and even audience feedback almost on the fly. I changed the episodes of Mascara many times. Some I used, some I threw out, but readers typically can't tell that anything has been left out or added.
So this is my process of putting together the story for a long, ongoing comic. I'm actually working on a long comic right now, so my posts have been a little sparodic, but I also like taking the time to share what it's like to create a story that can go on for a very long time. ^_^
Wednesday, November 25, 2015
Labels:
creating manga
,
writing
Read More
Creating Flexible Serialized Stories: Part Two
Brainstorm and Get Organized!
This a continuation of my previous post, Creating Flexible Serialized Stories: Part One. That post covered developing characters that compliment and contrast with each other in order to create an ongoing dynamic.
As I develop the characters, I like to think about their personalities and their situation. Then I write down everything that they could possibly do and all the trouble that they could cause together. It doesn't matter if it makes sense or not. The ideas don't need to be directly related or connect. I write it all. When outlining, each situation gets its own bullet point. I call each bullet point an "event."
It's best to do this using a digital program like Word or even Workflowy, because after brainstorming, everything will need to be rearranged.
Getting Everything Organized
After writing down all the possible situations that the characters could get themselves into, I arrange the events into a chronological order that makes sense to me. I've found it helpful to group events into sections called Act 1, Act 2, and Act 3. Creating acts was a suggestion from my husband, and I like how it works.
Act 1 is everything that helps the audience learn more about who the characters are, what they are like, and what problems they are dealing with. This is where I put every event that sounds like it could be at the beginning of the story.
Act 2 is where the characters grapple with their problems and fight their way to the solution. This is also a good time to introduce new characters and friends that either help the main characters to reach their goals, or hold them back from reaching their potential. I put the most interesting events in this category. Here is also where I sometimes put events that don't seem to fit anywhere, but are still interesting and exciting.
Act 3 is the wind down. This is where problems are solved, and when the characters realize that they are not quite the same as they were at the beginning. If the characters don't realize that they've changed, at least make it obvious to the audience.
Going back to the example I started with in Part One, by the end of the series the younger sister could be a little bit more social and the older sister could learn how to appreciate her own unique gifts.
It's okay not to use all of the events. Some I set aside. If I feel like using them, I'll pull them out of the reserve, and if I don't, than that's alright. But I try to use the majority of them.
At this point I do have an outline, but as far as story goes, it's a bit disjointed. The next part is how I bring it all together.
Friday, November 20, 2015
Labels:
creating manga
,
writing
Creating Flexible Serialized Stories: Part One
Part One: Coming up with a dynamic
This is one of the most detailed posts about writing comics that I've made in awhile, but I want to share more of what the process is like. This started out as one blog post about creating episodic stories, but it got so long I realized that it would be better to do this as a series of posts.
Hopefully those who are looking into creating a long running webcomic or any other type of serialized story will find these posts helpful.
For me writing comics goes in two directions.
These steps are especially important when creating a long webcomic, because with a webcomic it's difficult to go back and edit the story once it's posted. It's more like making a TV show than a novel.
Read More
This is one of the most detailed posts about writing comics that I've made in awhile, but I want to share more of what the process is like. This started out as one blog post about creating episodic stories, but it got so long I realized that it would be better to do this as a series of posts.
Hopefully those who are looking into creating a long running webcomic or any other type of serialized story will find these posts helpful.
For me writing comics goes in two directions.
The
first direction is a complete, contained story. For Couture and Wings, I
wrote the script from start to finish, like how someone would write a
novel. It's all one contained piece.
For long, continuous comics though, I've found that it's better to be flexible.
This blog post series covers the steps I take when creating a long comic. All of it is related to the post I wrote about writing scripts, but this is more about the planning that is done before writing a script.
These steps are especially important when creating a long webcomic, because with a webcomic it's difficult to go back and edit the story once it's posted. It's more like making a TV show than a novel.
For
a long story, I like to come up with two main characters with traits
that will lead to them getting into many different situations together.
Example:
There are two sisters who live together. The oldest one is social,
outgoing and good at making friends. She wishes to have creative talents
like her younger sister, but she does not. She tries to do creative
stuff sometimes, but it usually ends up being a disaster, and her
younger sister has to help her. On the other hand, the younger sister is
not social, but she is imaginative. She wishes to be more social
sometimes, so her older sister helps her out with that.
The
two characters are different, but they work together. Mascara is
written the same way. Two characters with complementary or opposing
traits that work together.
The situations that arise from their combined chemistry takes me to part two, which I'll be sharing in my next post.
The situations that arise from their combined chemistry takes me to part two, which I'll be sharing in my next post.
Wednesday, October 21, 2015
Labels:
creating manga
,
writing
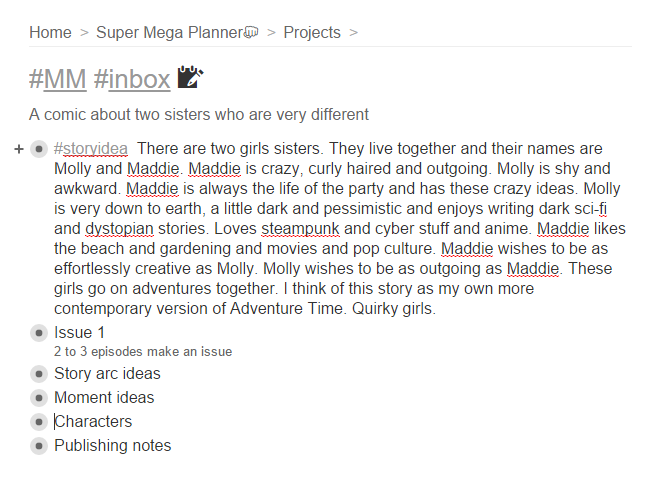
Using Workflowy for Story Outlines and Organization
Lately I've been working on the script for my latest comic. As far as plot goes, I have all of it planned from start to finish.
In the process I came across this really nice outlining app called Workflowy. This app definitely proves the power of simplicity and that almost anything can be made into a list. It's available for Android, Apple, and Chrome.
Here's how I've used Workflowy to organize the plot-line for my comic.
I have a bunch of projects going on so first I created a bullet point called Projects.

Then under that is my comic.

I've split up my comic project into six sections:

Story Idea: The general summary of the story.
Issue One: For me, two to three episodes make an issue. I'll go into the whole episode thing in more detail in a future post, but this section gives me a way to keep up with the progress I'm making on my comic. I keep track of what pages I have done, what part of the script I need to write, etc...
Story Arc Ideas: These are little stories that come together to create the whole plot-line. I usually start by brainstorming all of the different adventures and situations that the characters will get into. Then I go back and put these events into a logical order.
Moment Ideas: These are things that the characters do that can be put into any of the little stories in the story arc. For example, I might think it would be fun if one of the characters attempts to eat a whole box of ice cream. I'm not sure exactly where that would fit in, but I would like to see it happen. I make notes of ideas here, and I try to fit them in where ever I can within the short stories in the Story Arc Section.
Characters: Character names and descriptions. I like to do a @charactername hashtag for all of my characters, and I use them for each character name in my story arc ideas. This is great because when I do a search, I can see all of the short stories that a specific character appears in.

Workflowy doesn't support graphics beyond emoji, but if I wanted to put in a character sheet, I would just upload it to Google drive and paste the share link into the character description. I don't have any links in mine to character sheets because...I've been very bad lately.
Also I can link to notes from Evernote. I like using Workflowly along with Evernote. For me Workflowy is better for organizing ideas and projects, and Evernote is better for organizing information by topic.
Publishing Notes: Here is where I write details about the size of exported pages, physical page dimensions, and the requirements for the different websites where I will upload my comic. All technical stuff goes here.
So this is how my Workflowy looks. The coolest thing about this app is that I can organize it to fit my thinking style. I don't have to conform the way I think to how the app works.
Here's a referral link to give Workflowy a try: https://workflowy.com/invite/3090aa32.lnx. I highly recommend signing up using the referral link because this allows you to create 250 items (Each thing with a bullet point is an item) per month for free instead of the standard 100-ish items that it comes with. From experience I have to say that 100 items is not enough!
Read More
In the process I came across this really nice outlining app called Workflowy. This app definitely proves the power of simplicity and that almost anything can be made into a list. It's available for Android, Apple, and Chrome.
Here's how I've used Workflowy to organize the plot-line for my comic.
I have a bunch of projects going on so first I created a bullet point called Projects.

Then under that is my comic.

I've split up my comic project into six sections:
Story Idea: The general summary of the story.
Issue One: For me, two to three episodes make an issue. I'll go into the whole episode thing in more detail in a future post, but this section gives me a way to keep up with the progress I'm making on my comic. I keep track of what pages I have done, what part of the script I need to write, etc...
Story Arc Ideas: These are little stories that come together to create the whole plot-line. I usually start by brainstorming all of the different adventures and situations that the characters will get into. Then I go back and put these events into a logical order.
Moment Ideas: These are things that the characters do that can be put into any of the little stories in the story arc. For example, I might think it would be fun if one of the characters attempts to eat a whole box of ice cream. I'm not sure exactly where that would fit in, but I would like to see it happen. I make notes of ideas here, and I try to fit them in where ever I can within the short stories in the Story Arc Section.
Characters: Character names and descriptions. I like to do a @charactername hashtag for all of my characters, and I use them for each character name in my story arc ideas. This is great because when I do a search, I can see all of the short stories that a specific character appears in.

Workflowy doesn't support graphics beyond emoji, but if I wanted to put in a character sheet, I would just upload it to Google drive and paste the share link into the character description. I don't have any links in mine to character sheets because...I've been very bad lately.
Also I can link to notes from Evernote. I like using Workflowly along with Evernote. For me Workflowy is better for organizing ideas and projects, and Evernote is better for organizing information by topic.
Publishing Notes: Here is where I write details about the size of exported pages, physical page dimensions, and the requirements for the different websites where I will upload my comic. All technical stuff goes here.
So this is how my Workflowy looks. The coolest thing about this app is that I can organize it to fit my thinking style. I don't have to conform the way I think to how the app works.
Here's a referral link to give Workflowy a try: https://workflowy.com/invite/3090aa32.lnx. I highly recommend signing up using the referral link because this allows you to create 250 items (Each thing with a bullet point is an item) per month for free instead of the standard 100-ish items that it comes with. From experience I have to say that 100 items is not enough!
Friday, October 16, 2015
Labels:
creating manga
,
writing
 And if it's not a notebook, I'll grab my pen tablet and start writing by hand in a note-taking app.
I've tried to be modern and type my scripts, but I end up with writing that's missing intensity.
I remember getting my first journal way back in the fourth grade. I would sit on the bed with the notebook, filling it with my private thoughts and stories. That was my moment for me--my little mental vacation. I could be whoever I wanted in my journal. So now when I sit down with a notebook or simply use a pen to write something, those same feelings come back to me. This is my own space. Here I can write what I want.
I find typing scripts frustrating. Something about the way my thoughts show up on the screen...my ideas feel restrained when I type. I self-edit more while typing and think more. But when I write by hand, I just spew out whatever comes to my mind. There is no holding back.
Read More
Writing Scripts for Manga: Handwriting or Typing?
I've tried over and over again to type my scripts, but every time I end up pulling out a notebook and resorting to writing by hand out of frustration.

I've tried to be modern and type my scripts, but I end up with writing that's missing intensity.
I remember getting my first journal way back in the fourth grade. I would sit on the bed with the notebook, filling it with my private thoughts and stories. That was my moment for me--my little mental vacation. I could be whoever I wanted in my journal. So now when I sit down with a notebook or simply use a pen to write something, those same feelings come back to me. This is my own space. Here I can write what I want.
I find typing scripts frustrating. Something about the way my thoughts show up on the screen...my ideas feel restrained when I type. I self-edit more while typing and think more. But when I write by hand, I just spew out whatever comes to my mind. There is no holding back.
Wednesday, October 7, 2015
Labels:
creating manga
,
writing

Read More
The Jane Austin Influence

I think as far a classic writers go, Jane Austin has influenced me the most. That's not too surprising. Her stories lend themselves shoujo. I enjoy her work so much, that I tend to give her stories a little nod once in awhile in my own. In this instance, I had the main character of this story name the main character in her story Elizabeth, like in Pride and Prejudice.
I think I'm going to add some typing sound effects to this page.
Friday, August 14, 2015
Labels:
writing

Read More
I'm Not A Good Writer

When I write a rough
draft of anything, it is a complete mess. Usually, I can barely stand to read
my rough drafts because they are so amateur. Going from my brain to the paper,
my writing is full of unnecessary and forgotten words, awkwardness, ugly descriptions,
and things that simply make no sense.
I have a boss who is
dyslexic, and he's always asking me to help him with spelling stuff. Well,
because my spelling is bad too, I'm no help at all. It's probably worse than
his, and I don't have a learning disability. He so would not believe me if I
told him I was a writer. How can someone as horrible as me be a writer?
It's scary, but
while writing pages and pages in this awful way, I rarely look back to fix
stuff. In the back of my mind, I know what I'm writing is for the garbage, but
that's okay. I only need to get the story out of my head. If I'm really into
the story, it's okay if my writing is
way less than perfect. It's okay.
So yes, I am a
horrible writer. What I am is a good editor. Now that I think about it, it may
not even be fair to say specifically that I'm a good editor because I like
showing my work to different people to get feedback. It's probably more
accurate to say that I'm good at the editing process. I know what to keep, and
I'm not afraid of throwing stuff out.
Even before I
started sharing what I write publicly, anything I wrote that I considered
done was edited about five times. First I revise, making the story says what I
want. I make sure the events are in the right order, the story has the right
tone, and that the plot is tight. I do that twice. Afterwards, I hit the grammar, and it's two
rounds of that. Then at the end, I do
one more overall edit. I have edited more times, but that's the typical
process.
Although I do get
frustrated with how rough my rough drafts are, I'm kind of proud of owning up
to being a bad writer. I rarely get
writer's block because I'm not paralyzed by attempting to write perfectly. I
know getting things perfect the first time around is impossible for me. When I
write, I write directly without stopping.
There is no reason
to stop if I'm writing my thoughts, and I'm not too concerned with how things
are turning out.
Wednesday, August 5, 2015
Labels:
creating manga
,
Creative Living
,
writing

Read More
Less is More With Creativity Too

It's interesting how
when I have less to work with, I have more ideas. That could be because I'm
forced to use what I have and think of alternatives.
Recently, I've come
to the sad realization that I may not be able to create any more full manga
series. It's all about time. When I created my first few mangas, I had less
responsibilities. Now I can barely do one page a week, when I was making on
average four pages a week in the past.
Being so limited is
frustrating. Still it makes me think of other ways to deal with it. Lovely Riot is a story I want to tell.
So I've decided to
try a storytelling experiment. I'm writing Lovely
Riot like a novel, but then I'm also adding some manga style graphics to
it. The tricky part is that the artwork isn't like typical illustrations, which
are pictures of what's already going on. The artwork is actually going to be
part of the story. Without the art, it will feel like something is missing.
I'm testing this
technique out on one chapter, just to see what methods and layouts I will have
to use to get it to feel right. It is a bit crazy and a risk, but it could end
up being something very interesting, and I'm excited about the possibilities.
Friday, July 31, 2015
Labels:
Blogging
,
writing

Read More
Writing Can Alter the Future

My own future or
someone else's.
I recently received this touching open letter.
I laugh when I see that I've inspired someone else to write a blog, when my
husband originally inspired me to start one.
Before we started
dating, he emailed to me a link to his gaming blog. I thought it was amazing
how he wrote about what he was playing and working on. At the time I was
working on my first manga Mascara, and I realized that I also had a lot to
share. So I started this blog.
Over the years I've
had times when I posted regularly, and other times when I barely posted at all.
There are blogs with way more readers and traffic than mine. Sometimes I ask
myself why do I keep posting?
I think it's a need
for self-expression. When I write I'm able to express myself better.
I've also kept
writing blog posts because it's great practice. After working on manga for such
a long time, I found writing to be somewhat difficult when I got back to it.
Keeping up with my blog made the idea of writing a novella less intimidating.
The best thing about
blogging and just writing in general, is that I never know when something I
write will have the power to alter my future. In her open letter Ari mentions a
novel I wrote called Omnigirl. I wrote it when I was around 15, and I've shared
it with some of my friends. I never thought much of it, but I realize now that
If I never wrote it, my life would've been very different.
I shared Omnigirl
with my husband when we were friends, and after reading it, he realized that he
wanted to ask me out. My whole current situation of being happily married is
because of a novel I wrote when I was fifteen.
Now every time I
start typing I wonder if the words I take so lightly at the moment will somehow
drastically affect what happens in my life or the lives of others. It's fun to think about!
Friday, July 17, 2015
Labels:
art
,
Creative Living
,
DIY
,
writing
Creating the Ultimate Most Organized Creative Planner Ever
These past three posts cover how my notebook has evolved from simple to-do lists to a place where I can express myself visually:
Read More
Creating the Ultimate Most Organized Creative Notebook Ever Part 2
Creating the Ultimate Most Organized Creative Notebook Ever Part 3
Throughout the process of creating the perfect notebook for myself, I realized that there are some extra things I needed that I didn't even think about when I started.
For one thing, a notebook simply does not have enough paper in it to last a year. Also I realized that I would like to have a calendar in my notebook as well. I wasn't sure what to do. I began to wonder if I was demanding too much.
I went to Target and started roaming their office supply section to see if anything would hit me.
While working on my notebook I came across planners like The Happy Planner and Life Planner. I think between the two I like The Happy Planner more. It's easy to add to it. Also I've seen the Happy Planner at Hobby Lobby, so if I brought my coupons, this planner could be affordable. The only thing that I don't like about it is the limited selection of cover styles. In that area, the Life Planner has more to offer. However, both of these planners are quite large, so they would be a pain to carry around.
While I was at Target, I came across a sturdy mini-binder. It was plastic, so it would be durable. A mini-binder is a tiny bit bigger than I would like, but it's still not a chore to carry around. It's easy to find printable pages for mini binders on-line, so I wouldn't have to invest a lot of money to make it what I want.
The main thing that's different about a binder compared to a notebook is that pages can be moved around and added to a binder.
I've divided my binder into four sections: Monthly, Daily, Notes, and Shopping. Although the pages can be moved, I've decided to organize the notes section like I would in a notebook. It would be too much to try to group my notes together by physically moving them around. It would be easier to simply write linearly, and then have an index in the front of the notes section so I could find what I'm looking for.


Since I'm not locked into a brand of planner, it's easier for me to give my planner that whimsical anime style that I like, and include all different kinds of papers in different colors. Another plus about using a mini-binder is that pages are half of an 8.5 in x 11 in, so creating pages isn't much work. And if I really needed to, I can order paper already made that size.


It will be about a month before I finish my current notebook and start this planner, but I think it will go well.
Overall, I'm glad that I took on this challenge. It involved much more effort than if I bought what was already out there, but I wanted to create something that was specifically tailored to me and how my life works. It's totally worth it!
Creating the Ultimate Most Organized Creative Notebook Ever Part 3
Throughout the process of creating the perfect notebook for myself, I realized that there are some extra things I needed that I didn't even think about when I started.
For one thing, a notebook simply does not have enough paper in it to last a year. Also I realized that I would like to have a calendar in my notebook as well. I wasn't sure what to do. I began to wonder if I was demanding too much.
I went to Target and started roaming their office supply section to see if anything would hit me.
While working on my notebook I came across planners like The Happy Planner and Life Planner. I think between the two I like The Happy Planner more. It's easy to add to it. Also I've seen the Happy Planner at Hobby Lobby, so if I brought my coupons, this planner could be affordable. The only thing that I don't like about it is the limited selection of cover styles. In that area, the Life Planner has more to offer. However, both of these planners are quite large, so they would be a pain to carry around.
While I was at Target, I came across a sturdy mini-binder. It was plastic, so it would be durable. A mini-binder is a tiny bit bigger than I would like, but it's still not a chore to carry around. It's easy to find printable pages for mini binders on-line, so I wouldn't have to invest a lot of money to make it what I want.
The main thing that's different about a binder compared to a notebook is that pages can be moved around and added to a binder.
I've divided my binder into four sections: Monthly, Daily, Notes, and Shopping. Although the pages can be moved, I've decided to organize the notes section like I would in a notebook. It would be too much to try to group my notes together by physically moving them around. It would be easier to simply write linearly, and then have an index in the front of the notes section so I could find what I'm looking for.


Since I'm not locked into a brand of planner, it's easier for me to give my planner that whimsical anime style that I like, and include all different kinds of papers in different colors. Another plus about using a mini-binder is that pages are half of an 8.5 in x 11 in, so creating pages isn't much work. And if I really needed to, I can order paper already made that size.


It will be about a month before I finish my current notebook and start this planner, but I think it will go well.
I'm also taking a closer look at discbound notebooks. I learned about them as I was looking for printables for my mini-binder. Turns out discbound notebooks can be easily made from scratch and are also interchangeable with other planner systems, such as The Happy Planner and Arc Planner.
The appeal of discbound notebooks is that they're compact like a spiral bound, but pages can be moved around and added like in a binder. It lies completely flat, and there aren't any huge binder rings in the way while writing. It's also possible to make a notebook in the 5" x 8" range, which is what I really want.
The appeal of discbound notebooks is that they're compact like a spiral bound, but pages can be moved around and added like in a binder. It lies completely flat, and there aren't any huge binder rings in the way while writing. It's also possible to make a notebook in the 5" x 8" range, which is what I really want.
I've already ordered a discbound hole punch, so I can't wait to see what I can make of it. I'll probably do an update post about it. I've also learned a few extra things while creating this notebook that may be helpful that I would like to share in the future.
Overall, I'm glad that I took on this challenge. It involved much more effort than if I bought what was already out there, but I wanted to create something that was specifically tailored to me and how my life works. It's totally worth it!
Friday, July 10, 2015
Labels:
art
,
Creative Living
,
DIY
,
writing
Creating the Ultimate Most Organized Creative Notebook Ever: Part Three
My creative notebook was almost perfect. I could put in any kind of note I wanted while successfully keeping it organized. But most of the pages were full of only my handwriting. It was a bit boring. I wanted more art and color on my pages. I also desired to easily add photos and random paper clippings from my life to it as well.
While working on this project, I decided to take a look at the very popular Project Life scrap booking system. Before I had only heard of it and had a hazy idea of what it was. When I did more research on it, I quickly saw that it didn't fit my needs. A Project Life album would be too much for me to carry around in my bag, and it was more for scrap-booking, not note-taking. Besides that, I prefer paper pages over fully plastic ones.
Still there was one thing I absolutely loved about it. I thought it was awesome how photos and other visual items could be added to a Project Life album without worrying about layout. So I cooked up my own way of doing something similar.
I've always enjoyed creating artist trading cards. They're a simple way to make art, and they come in a standard size: 2.5" x 3.5" These cards fit perfectly into plastic sleeves that are used for trading cards. Also there are all kinds of papers designed to fit into the sleeves, from watercolor paper to scrap booking style paper.Variety was what I was searching for.
Using double sided tape I attached the plastic sleeves to the notebook pages, creating a simple layout. I've found that it's best to have the sleeves near the edges of the pages instead of near the inside. The closer they are to the spine, the harder it is to close the notebook. The mixed-media notebook I chose is designed to handle an expanding book, so that was helpful.
Another bonus to using the 2.5" x 3.5" sleeves is that it makes it easy to add photos from my Instax Mini 8 camera.


I'm fortunate to be married to a guy who enjoys designing games for fun. He had a MS word template I could use to print out even more cards to slip into the sleeves. Using that and Canva as a design tool, I realized that these tiny pockets are perfect. It's a daily scrapbook/planner that's easy to carry around, and very simple to customize. Besides I don't have the time to create larger pieces of art that covers a whole page. A 2.5" x 3.5" card is plenty.
I was pretty happy with the results, and the pages look nice. However I noticed that after four months I would run out of pages and need a new notebook. I was a little disappointed. Having a notebook that could last all year would be ideal. Also I realized that I would like to have a calendar in my notebook too.
Turns out I needed more than a notebook. I needed a high powered planner. The next post in this series is about how I used what I learned from creating this Ultimate Notebook to design my Ultimate Creative DIY planner.
Read More
 |
| Boring! |
While working on this project, I decided to take a look at the very popular Project Life scrap booking system. Before I had only heard of it and had a hazy idea of what it was. When I did more research on it, I quickly saw that it didn't fit my needs. A Project Life album would be too much for me to carry around in my bag, and it was more for scrap-booking, not note-taking. Besides that, I prefer paper pages over fully plastic ones.
Still there was one thing I absolutely loved about it. I thought it was awesome how photos and other visual items could be added to a Project Life album without worrying about layout. So I cooked up my own way of doing something similar.
I've always enjoyed creating artist trading cards. They're a simple way to make art, and they come in a standard size: 2.5" x 3.5" These cards fit perfectly into plastic sleeves that are used for trading cards. Also there are all kinds of papers designed to fit into the sleeves, from watercolor paper to scrap booking style paper.Variety was what I was searching for.
Using double sided tape I attached the plastic sleeves to the notebook pages, creating a simple layout. I've found that it's best to have the sleeves near the edges of the pages instead of near the inside. The closer they are to the spine, the harder it is to close the notebook. The mixed-media notebook I chose is designed to handle an expanding book, so that was helpful.
Another bonus to using the 2.5" x 3.5" sleeves is that it makes it easy to add photos from my Instax Mini 8 camera.


I'm fortunate to be married to a guy who enjoys designing games for fun. He had a MS word template I could use to print out even more cards to slip into the sleeves. Using that and Canva as a design tool, I realized that these tiny pockets are perfect. It's a daily scrapbook/planner that's easy to carry around, and very simple to customize. Besides I don't have the time to create larger pieces of art that covers a whole page. A 2.5" x 3.5" card is plenty.
I was pretty happy with the results, and the pages look nice. However I noticed that after four months I would run out of pages and need a new notebook. I was a little disappointed. Having a notebook that could last all year would be ideal. Also I realized that I would like to have a calendar in my notebook too.
Turns out I needed more than a notebook. I needed a high powered planner. The next post in this series is about how I used what I learned from creating this Ultimate Notebook to design my Ultimate Creative DIY planner.
Friday, July 3, 2015
Labels:
art
,
Creative Living
,
DIY
,
writing

In my last Ultimate Creative Notebook post, I wrote about what qualities I was looking for in my notebook. After I found a notebook that fits those needs, then came the hard part: figuring out how to keep it all organized. Organization is especially important for a notebook that will be used as a dumping ground for everything.
I found two helpful systems to keep things organized.
The first is the Bullet Journal system. This great for keeping a notebook with different kinds of content organized. I put a legend at the front so I can keep up with what symbols I use. Over time, I've seen that I only use two symbols. In the future I will probably simplify the list.

Another method is marking the edges of the pages. Here's the Lifehacker post about that. I like this because all I have to do is look at the side of my notebook to see where certain entries are. Using different colors on the edges of the pages instead of just black has worked out better for me.


Read More
Creating the Ultimate Most Organized Creative Notebook Ever: Part Two

In my last Ultimate Creative Notebook post, I wrote about what qualities I was looking for in my notebook. After I found a notebook that fits those needs, then came the hard part: figuring out how to keep it all organized. Organization is especially important for a notebook that will be used as a dumping ground for everything.
I found two helpful systems to keep things organized.
The first is the Bullet Journal system. This great for keeping a notebook with different kinds of content organized. I put a legend at the front so I can keep up with what symbols I use. Over time, I've seen that I only use two symbols. In the future I will probably simplify the list.

Another method is marking the edges of the pages. Here's the Lifehacker post about that. I like this because all I have to do is look at the side of my notebook to see where certain entries are. Using different colors on the edges of the pages instead of just black has worked out better for me.


I mark a topic by putting a color by it in the front index. Then I color the sides of the pages in the same area as shown on Lifehacker. The problem with using color to keep the notebook organized is that if there are a lot of different topics in the same book, it can get confusing.
Things worked the best when I used the Bullet Journal method to keep my all of my notes organized, and added color coding only to note topics I wanted to keep track of and needed to find quickly.
I needed to make some changes to my notebook so that adding visual items would be easy. I found an effective way to do this which I'll share in part three.
Things worked the best when I used the Bullet Journal method to keep my all of my notes organized, and added color coding only to note topics I wanted to keep track of and needed to find quickly.
As I was doing research on organizing this notebook, I realized that there are many notebooks out there that claim to keep life organized. I've seen goal books, workbooks, and things like that. They are very tempting. However, I have a history of buying planners, fancy ones and plain ones, with the hope that they could be a place where I pull all of my thoughts together. I use these diaries and planners for maybe a month, and then I don't use them anymore.
I think pre-organized notebooks use systems that work perfectly for the person who designed it, but not for me. They are not easy to customize. I need something that fits the way my mind works and is adaptable. By the way, some of these specialized notebooks are very expensive. I would feel horrible if I invested in one, just to never use it.
I've promised myself that I will create my own notebook first, and if I stumble across some commercially made notebook that fulfills my needs, aligns with the way my brain operates, and is a reasonable price, I would go with it. But that's yet to happen.
As I worked on making a notebook for myself, I began to get a clearer picture of what I would use it for. Starting out, the pages only consisted of simple to-do lists and notes.
 |
| A very boring page |
I didn't create as much art in it as I imagined, which was disappointing. I wanted to do art journaling, but I didn't have the time for it, so most my pages were boring. I wanted them to be beautiful and interesting. I did try some art journaling techniques, but I'm not good at coming up with nice page layouts.
 |
| An art journaling attempt |
I needed to make some changes to my notebook so that adding visual items would be easy. I found an effective way to do this which I'll share in part three.
Friday, June 26, 2015
Labels:
art
,
Creative Living
,
DIY
,
writing
Creating The Ultimate Most Organized Creative Notebook Ever: Part One
Although I use my tablet for many things, I find that when it comes to making to-do lists and notes of ideas that hit me randomly throughout the day, I prefer a notebook. Like, on paper.
I used to regularly keep a journal, and I have a bunch of different notebooks with my stories, sketches, etc... I think that's very normal for people who write and create a lot.
But I've always had this dream of having the ULTIMATE notebook. That is a notebook where I can store my handwritten notes, snippets of stories, ideas, and art all in one place.
I'm really close to actually reaching that goal. I have found some ways to put different kinds of information into one notebook, and yet keep the information organized. Creating this notebook has been in a strange way--an adventure. I think I've learned more about how my mind organizes things by working on this.
I'll be explaining the process of making this notebook over a few posts, and I hope that others who wish to organize their creative to-do lists and ideas find these posts helpful.
When I first started working on this Ultimate Notebook project, my needs were pretty simple.
Here's what I was looking for when I first started:
Sturdy and Durable
So I can carry it with me everywhere. And it also has to be a size that is appropriate for carrying everywhere.
A Good Amount of Pages
Because I have a lot of info to put into it.
Mixed Media Paper
Since I will be adding artwork from different mediums, including watercolor.
Extra Pockets
I like storing stuff.
So I decided to use this notebook:


It has all of the above plus a nice little notch for storing a pen.
How I'm went about organizing this notebook is another thing. I'll explain that in more detail in a part two post, but as a sneak peak check out this site about creating a Bullet Journal. It really influenced how I decided to put this notebook together.
Read More
I used to regularly keep a journal, and I have a bunch of different notebooks with my stories, sketches, etc... I think that's very normal for people who write and create a lot.
But I've always had this dream of having the ULTIMATE notebook. That is a notebook where I can store my handwritten notes, snippets of stories, ideas, and art all in one place.
I'm really close to actually reaching that goal. I have found some ways to put different kinds of information into one notebook, and yet keep the information organized. Creating this notebook has been in a strange way--an adventure. I think I've learned more about how my mind organizes things by working on this.
I'll be explaining the process of making this notebook over a few posts, and I hope that others who wish to organize their creative to-do lists and ideas find these posts helpful.
When I first started working on this Ultimate Notebook project, my needs were pretty simple.
Here's what I was looking for when I first started:
Sturdy and Durable
So I can carry it with me everywhere. And it also has to be a size that is appropriate for carrying everywhere.
A Good Amount of Pages
Because I have a lot of info to put into it.
Mixed Media Paper
Since I will be adding artwork from different mediums, including watercolor.
Extra Pockets
I like storing stuff.
So I decided to use this notebook:


How I'm went about organizing this notebook is another thing. I'll explain that in more detail in a part two post, but as a sneak peak check out this site about creating a Bullet Journal. It really influenced how I decided to put this notebook together.
Wednesday, June 17, 2015
Labels:
art
,
DIY
,
writing
Although I Buy Mostly Ebooks, I Still Love Print
First of all, I'm definitely a girl in love with her tablet. I prefer buying ebooks from Amazon, and it's my main way of reading. Still I have this deep love for print. I feel like with the rise of ebooks, print has become more special. For example, if I read a book that I really enjoy in digital form, I'm more likely to buy the print version so I can display it on my shelf. Also many graphic novels I prefer to have in print because they are like works of art. The ebook version is pretty, but the print version is really wonderful.
Read More
I think that's part of the reason why I like dabbling into making cute, little, random print zines once and awhile.
Right now I'm working on the second and most likely the last issue of a zine I was doing for my Etsy Shop called Blanket Princess.

I say it's the last issue because I'm shifting my main focus to my manga right now. I will probably make more zines with different themes and titles in the future. Blanket Princess is a zine made up of random stories, artwork, DIY projects, and parts of manga I've already published. The second issue simply finishes off those stories and introduces some more DIY and art.

I say it's the last issue because I'm shifting my main focus to my manga right now. I will probably make more zines with different themes and titles in the future. Blanket Princess is a zine made up of random stories, artwork, DIY projects, and parts of manga I've already published. The second issue simply finishes off those stories and introduces some more DIY and art.
Sure, making an ezine is probably a little easier, but print seems more private. Print is tactile and intimate, and I enjoy creating things on paper. Overall I feel like reading print books involves more senses than ebooks do.
Reading an ebook only involves my eyes, and if it's an interactive book--maybe my ears too. But with a print book, I'm using my eyes, my nose (you know, that awesome new book smell) and my touch because of the texture of the pages and the physical motion of turning them.
It's funny how when I was younger, the activity of reading physical books was not noteworthy to me. Now it is.
Now you can follow me on Bloglovin!
Friday, May 15, 2015
Labels:
Blogging
,
writing

Until recently, I've realized that my life has changed a lot over the past 5 years. It's like I was just going along living and doing stuff, and I didn't realize how much has changed until I took a moment one day to look back.
Read More
Rebuilding My Creative Routine to Break Out of a Rut

Then I could clearly see why I was having such a difficult time getting into my creative projects, and finding time to do them. Three years ago, I was unmarried and living at home. Now I have a husband and a house to deal with and chores and whatever comes with all of that.
Still, I was trying to stick to the creative routine that I had three years ago--like nothing had changed.
But EVERYTHING had changed. And that's why the old way of doing things that was so great before, was no longer working.
I started this blog 5 years ago, and back then I was focused on graphic novels and manga. I'm still focused on graphic novels and manga (I'm working on a new graphic novel at this moment), but I've realized that just focusing on that topic has limited me on how much I share about the little creative projects and processes that I take on everyday.
And honestly I find writing about that more interesting than the basics of graphic novel making. Not that I won't write about that anymore, but I want cover a broader range of subjects about creating things.
Now I'm excited about writing and making stuff all over again!
So next time when I'm stuck in a rut, I think I'll take a moment to step away from everything. I'll look at my past and ask myself "Is it different from now?" Then I'll think about the future, and see if I'm where I want to be now to get there. Sometimes a little reflection is all it takes to get things back on track.
To make things neater, I've reorganized my blog posts into categories on the top bar. I find it makes finding relevant articles way easier.
Also if you're only here for the posts I write about creating manga and don't wish to be bothered with the other stuff, that's fine. Simply subscribe to the filtered RSS feed that's on the right. It only shows posts that are tagged Manga.
Thank you so much for reading, and hopefully I will be updating this blog for many years to come. ^_^
Sunday, February 15, 2015
Labels:
writing
The Blue Room Café: Now Free For Kindle and Textnovel's Editor's Choice for 2015
The other day when I checked Textnovel, I was thrilled to see that The Blue Room Café had been awarded Editors Choice for 2015. There are many, many stories on that site, so to get the recognition is really special.
And even more thrilling is that for the next three days The Blue Room Café is available for free on Kindle. Click here to get a copy!

I'm really happy to be sharing this story with you. I feel like a proud mama, lol!
So get it free while you can, and if you enjoy it please leave a review!
Now with this novel done, I'm switching back to manga mode. It's hard to explain, but working on this novella has had a huge impact on the way that I feel I should approach creating my manga. Overall, it has been a very positive experience. I can't show enough gratitude towards everyone who helped me out.
If you would like to be notified of my next manga and novella projects, please subscribe to the email list.Thanks!
By the way, although now I'm focusing on my manga, I do have plans to work on another novella, here and there. ^_^
Read More
And even more thrilling is that for the next three days The Blue Room Café is available for free on Kindle. Click here to get a copy!
I'm really happy to be sharing this story with you. I feel like a proud mama, lol!
So get it free while you can, and if you enjoy it please leave a review!
Now with this novel done, I'm switching back to manga mode. It's hard to explain, but working on this novella has had a huge impact on the way that I feel I should approach creating my manga. Overall, it has been a very positive experience. I can't show enough gratitude towards everyone who helped me out.
If you would like to be notified of my next manga and novella projects, please subscribe to the email list.Thanks!
By the way, although now I'm focusing on my manga, I do have plans to work on another novella, here and there. ^_^
Subscribe to:
Posts
(
Atom
)


